# Monitoring
The 3 monitoring views from the monitoring panel of the landing page - Backup, Restore and Snapshot can be further expanded to get additional detailed information for Backups, Restores and Snapshots across a cluster/namespace. Expansion of these items, take the user to the Backup, Restore and Snapshot Overview pages respectively.

A few of the highlights of the detailed monitoring views are:
1. Ability to view a list backups/restores/snapshots for a specific namespace
2. Ability to view a list of backups/restores/snapshots for a set of user selected clusters or namespaces
3. Deeper details around a backup/restore/snapshots
### Backup Overview Page
Similar to the help icon on the landing page, clicking the help icon on the Backup Overview page starts the guided tour for the page.
The Backup Overview pages provide the following features.
1. Click-view for Failed/Available/In-progress/Queued/ Canceled items
2. Ability to view details around status log, backupPlan and metadata information for a specific backup item.
3. Ability to filter backups based on Type, Mode, Advanced params -> BackupPlan, Expiry etc.
4. The following screenshots provide an example of Backup Overview pages along with their details sections.
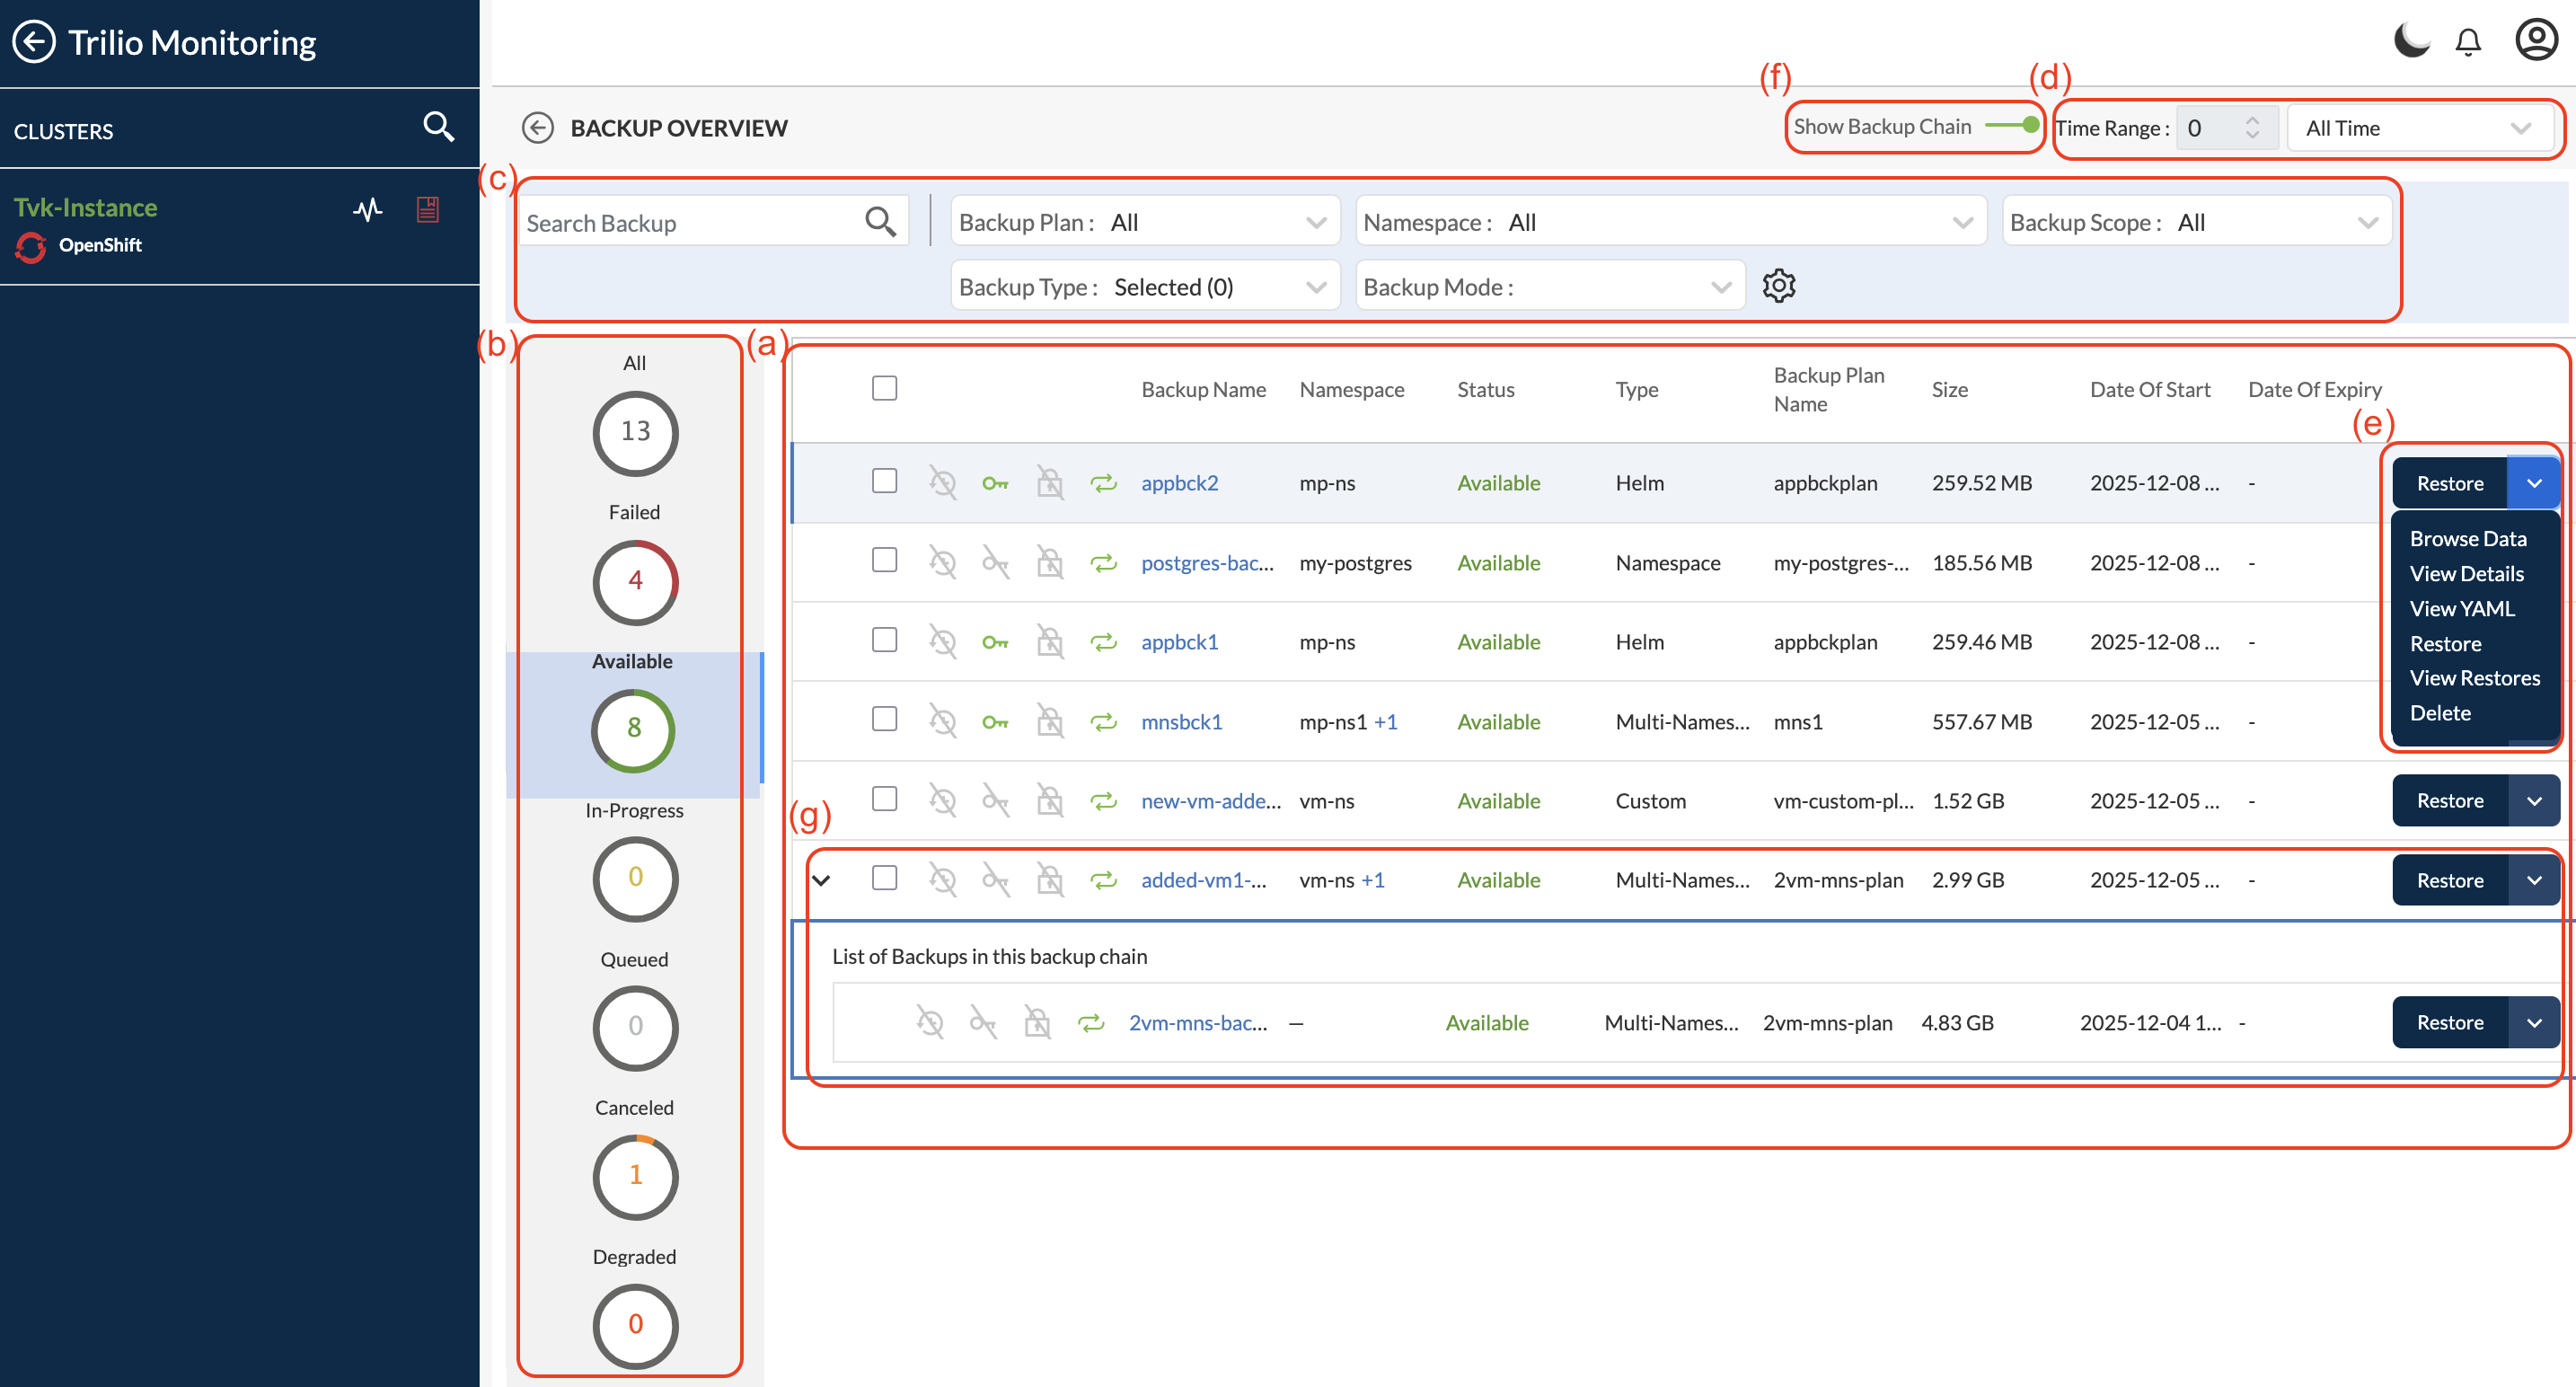
You can dig deeper into this by clicking **Details** in the same panel, which displays the following page:
**(a)** View all backups in the main window, which has multiple columns to provide a complete overview of each backup.
* The ‘Size’ column represents the total physical size of both application data and metadata. For incremental backups, it reflects only the size of the changed application data and associated metadata.
**(b)** Use the multiple column filters and search field to filter to the exact results that you want.
**(c)** View backups by status - On the left side, you can filter backups by **All**, **Failed**, **Available**, **In Progress**, **Queued** or **Canceled**.
**(d)** Filter by **Time Range** - Set the time unit to **Hour**, **Day**, **Week** or **Month** and then select a corresponding number.
**(e)** By clicking **Action** beside any backup, you can also take some actions such as:
* **View Details** - This displays a window with status details for **Status Log**, **Backupplan Summary**, and **Metadata Summary**.\

* **View YAML** - Click this to display a page with two tabs, **T4K Resource YAML** and **Application YAML**. **T4K Resource YAML** is displayed by default, which provides the ability to view and copy all YAML files for **Backup**, **Backupplan**, **Hook**, **Target** and **Target Credential Secret**.\
\
The **Application YAML** tab provides the ability to see an overview and copy application YAML files.\

* **Restore** - Click this to display a page with two tabs, **Basic** and **Advanced**. In the **Basic** tab, type a name for your backup into the **Name** field, select the namespace to restore from the **Restore Namespace** dropdown list, and use the **Restore Flags** toggle switches to configure your restore. Optionally, you can see a list of ignored resources by selecting **Click here** at the bottom of the screen. Once your backup is configured in this tab, click **Next**. The **Advanced** tab then displays, where you can **Transform Components**, **Exclude Resources** and set **Hook Configuration.** If you make changes in the **Advanced** tab, you must then click **Save**. Your backup now proceeds and once completed, you will see the **Restore Backup** success statuses.
* **View Restores** - This provides users with a top-level view of restores, categorising them into **Completed**, **InProgress**, and **Failed** statuses.\

* **Delete** - Select this to delete the corresponding backup. You will be prompted to confirm that you want to proceed with the deletion.\

* **Cancel** - This will cancel the in-progress Backup and clear all jobs related to that Backup. Once the Backup is cancel, that Backup is use to take Restore.\
\
More detail on [cancel-inprogress-backups](https://docs.trilio.io/kubernetes/getting-started/using-trilio/getting-started-with-management-console/index/creating-backups/cancel-inprogress-backups "mention")
**(f)** By enabling the **Show Backup Chain** toggle, the user can group the full and dependent incremental backups.
**(g)** This represents the actual grouping of full and incremental backups. The parent displays the latest incremental backup, followed by the incremental backups linked to the primary full backup. When multiple full backups and their dependent incremental backups exist, the UI will show multiple groups accordingly.
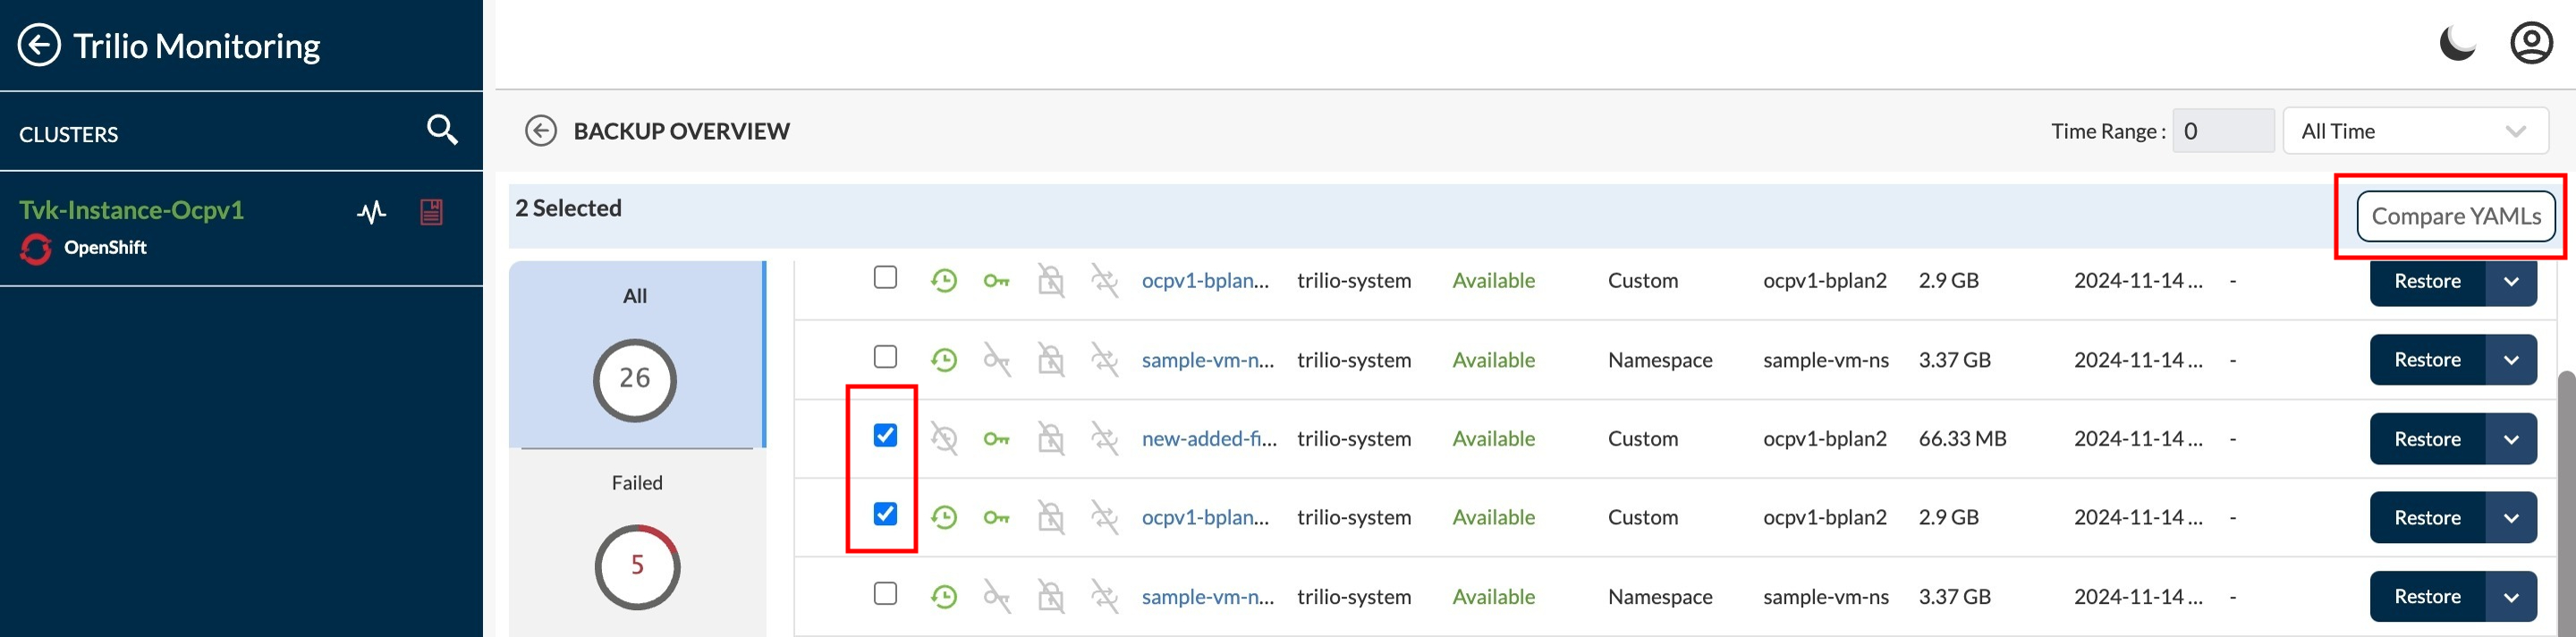
**Compare YAMLs** - Select multiple backups by clicking the corresponding selector checkboxes in the first column, or use the table header row checkbox to select/deselect all listed backups. When two backups are selected, a new option is provided - **Compare YAMLs**.
Clicking **Compare YAMLs** displays a side-by-side comparison of the selected backup-related YAMLs, which it splits into various resources (**Backup**, **Backupplan**, **Target, Secret,** and **Hook**). You can also copy the content from either YAML file using the copy symbol. Once finished, select **Close** to return to the parent menu.
### Snapshot Overview Page
Similar to the help icon on the landing page, clicking the help icon on the Snapshot Overview page starts the guided tour for the page.
The Snapshot Overview pages provide the following features.
1. Click-view for Failed/Available/In-progress/Queued items
2. Ability to view details around status log, backupPlan and metadata information for a specific snapshot item.
3. Ability to filter snapshots based on Type, Mode, Advanced params -> BackupPlan, Expiry etc.
4. The following screenshots provide an example of Snapshot Overview pages along with their details sections.
You can dig deeper into this by clicking **Details** in the same panel, which displays the following page:
**(a)** View all Snapshots in the main window, which has multiple columns to provide a complete overview of each Snapshot.
* The ‘Size’ column represents the total physical size of the application metadata.
**(b)** Use the multiple column filters and search field to filter to the exact results that you want.
**(c)** View Snapshots by status - On the left side, you can filter backups by **All**, **Failed**, **Available**, **In Progress** or **Queued**.
**(d)** Filter by **Time Range** - Set the time unit to **Hour**, **Day**, **Week** or **Month** and then select a corresponding number.
**(e)** By clicking **Action** beside any snapshot, you can also take some actions such as:
* **View Details** - This displays a window with status details for **Status Log**, **Backupplan Summary**, and **Metadata Summary**.\

* **View YAML** - Click this to display a page with two tabs, **T4K Resource YAML** and **Application YAML**. **T4K Resource YAML** is displayed by default, which provides the ability to view and copy all YAML files for **Snapshot**, **Backupplan**, **Hook**, **Target** and **Target Credential Secret**.\
\
The **Application YAML** tab provides the ability to see an overview and copy application YAML files.\

* **Restore** - Click this to display a page with two tabs, **Basic** and **Advanced**. In the **Basic** tab, type a name for your snapshot into the **Name** field, select the namespace to restore from the **Restore Namespace** dropdown list, and use the **Restore Flags** toggle switches to configure your restore. Optionally, you can see a list of ignored resources by selecting **Click here** at the bottom of the screen. Once your backup is configured in this tab, click **Next**. The **Advanced** tab then displays, where you can **Transform Components**, **Exclude Resources** and set **Hook Configuration.** If you make changes in the **Advanced** tab, you must then click **Save**. Your backup now proceeds and once completed, you will see the **Restore Snapshot** success statuses.
* **View Restores** - This provides users with a top-level view of restores, categorising them into **Completed**, **InProgress**, and **Failed** statuses.\

* **Delete** - Select this to delete the corresponding Snapshot. You will be prompted to confirm that you want to proceed with the deletion.\

**(f)** **Compare YAMLs** - Select multiple snapshots by clicking the corresponding selector checkboxes in the first column, or use the table header row checkbox to select/deselect all listed backups. When two snapshots are selected, a new option is provided - **Compare Yamls**. 
Clicking **Compare YAMLs** displays a side-by-side comparison of the selected backup-related YAMLs, which it splits into various resources (**Backup**, **Backupplan**, **Target, Secret,** and **Hook**). You can also copy the content from either YAML file using the copy symbol. Once finished, select **Close** to return to the parent menu.
### Restore Overview Page
Similar to the help icon on the landing page, clicking the help icon on the Restore Overview page shows the different controls available to the user.
The Restore Overview page provide the following features.
1. Click-view for Successful/In-progress/Failed items
2. Ability to view details around status log, restorePlan, and metadata information for a specific restore item.
3. Ability to filter Restore based on Name, Namespace, Status, Type, Advanced params -> Restore size etc.
4. The following screenshots provide an example of Restore Overview pages along with their details sections.

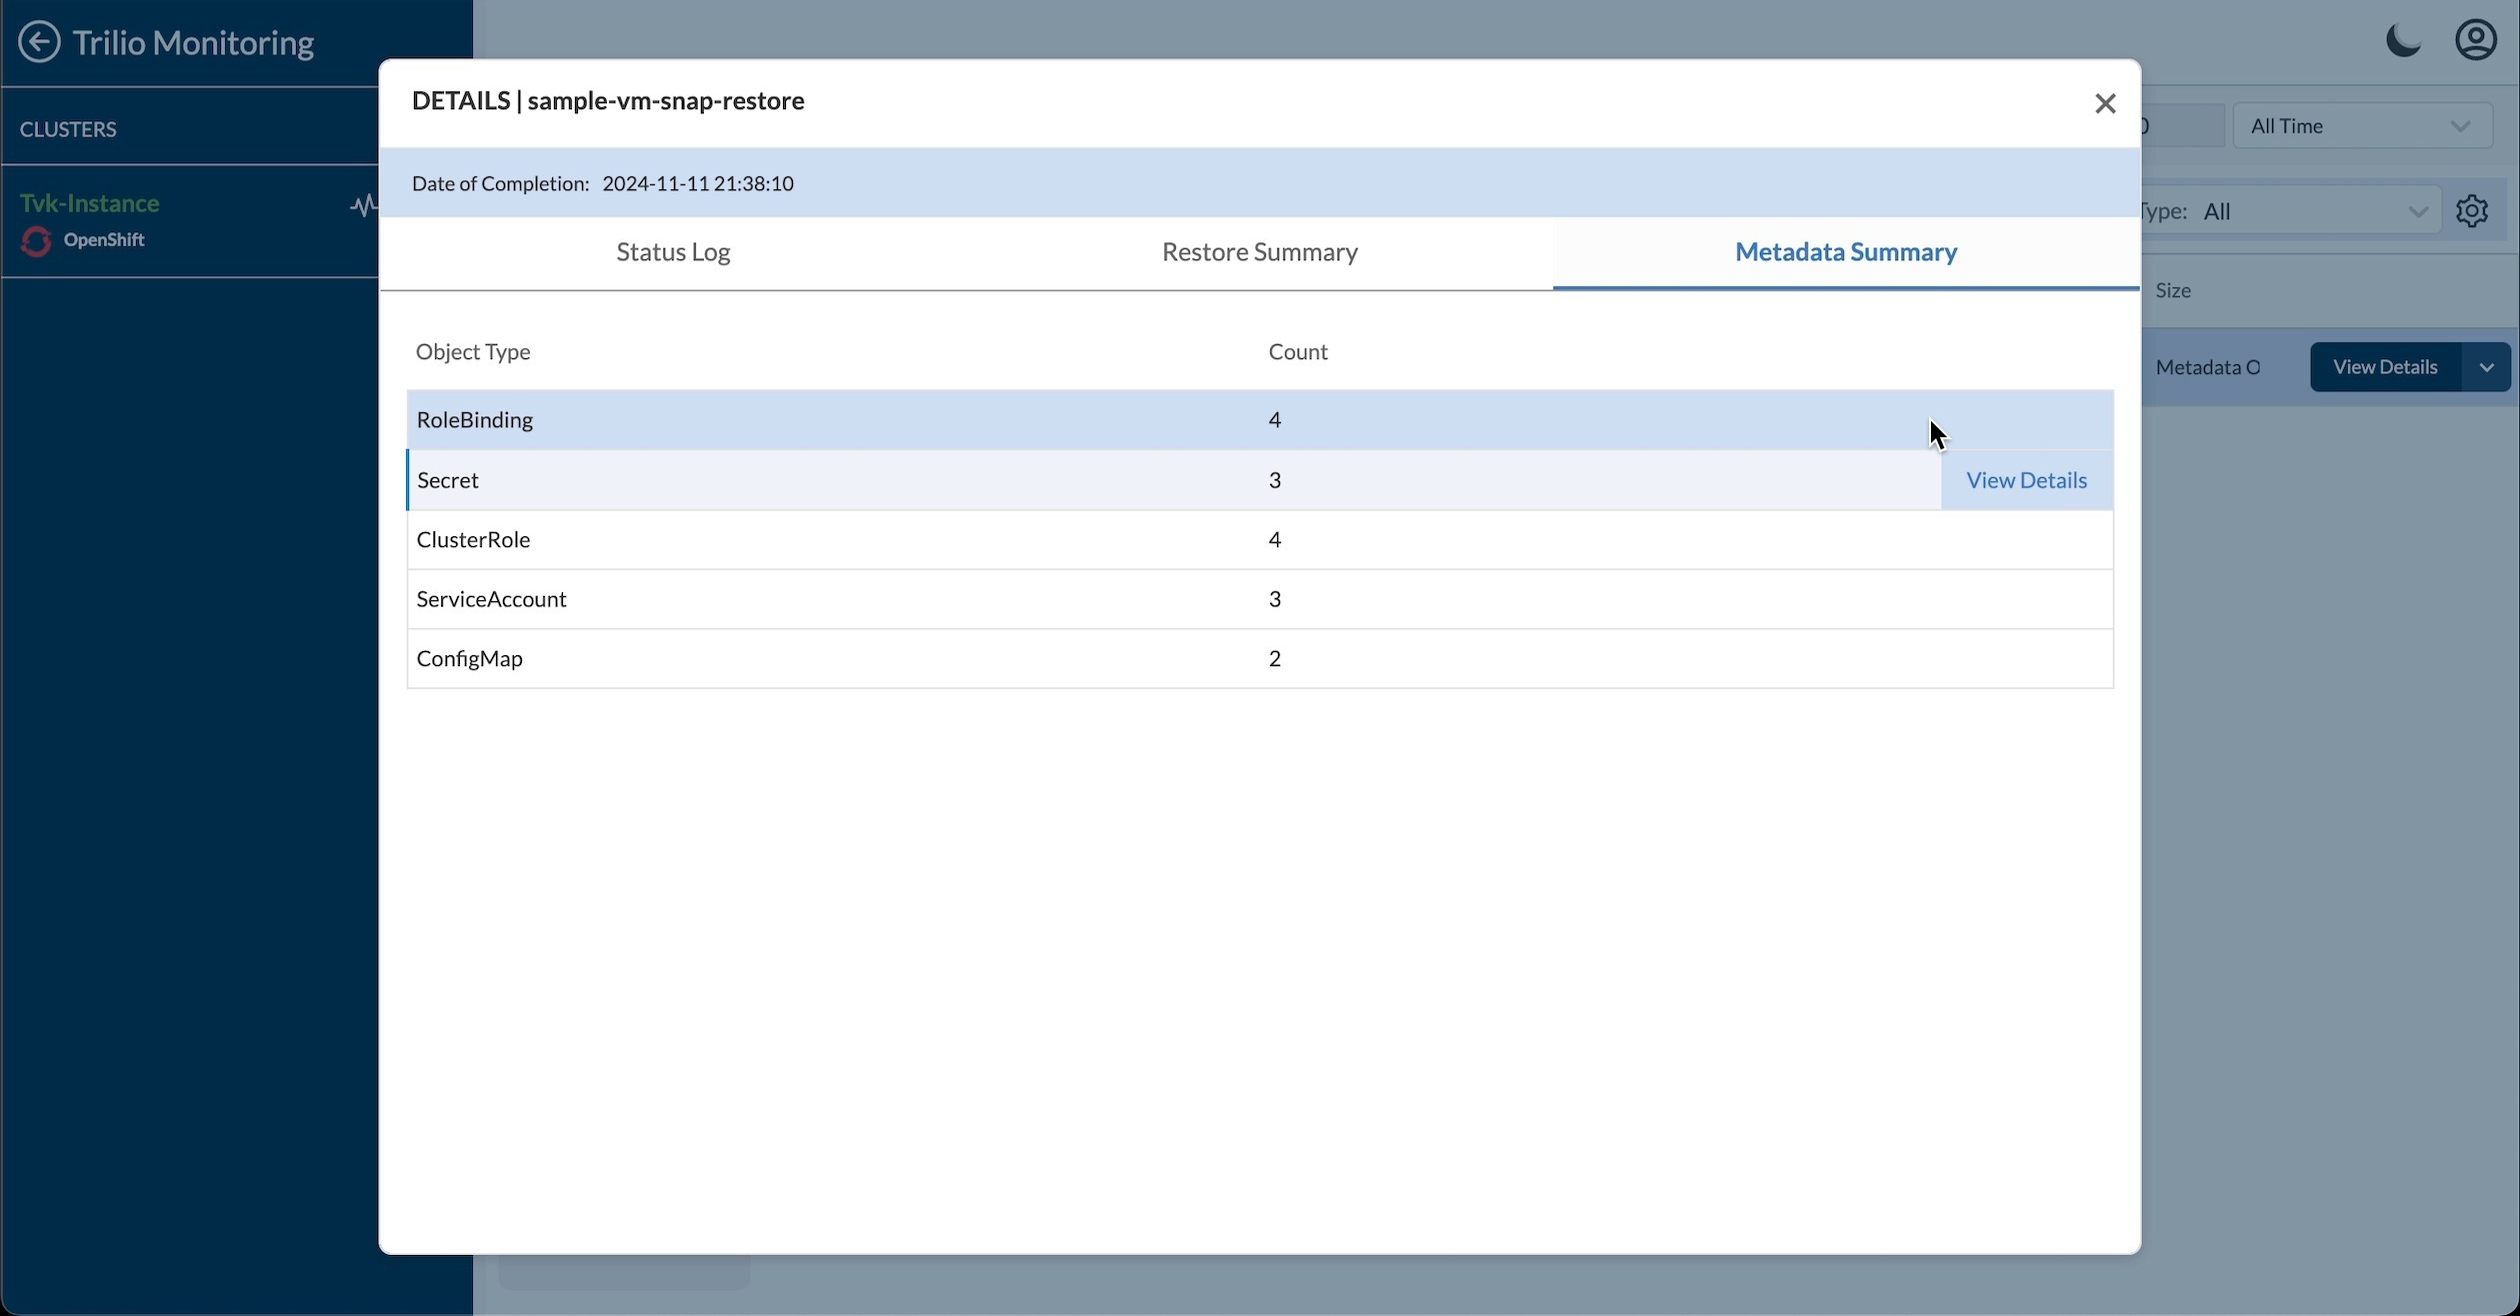
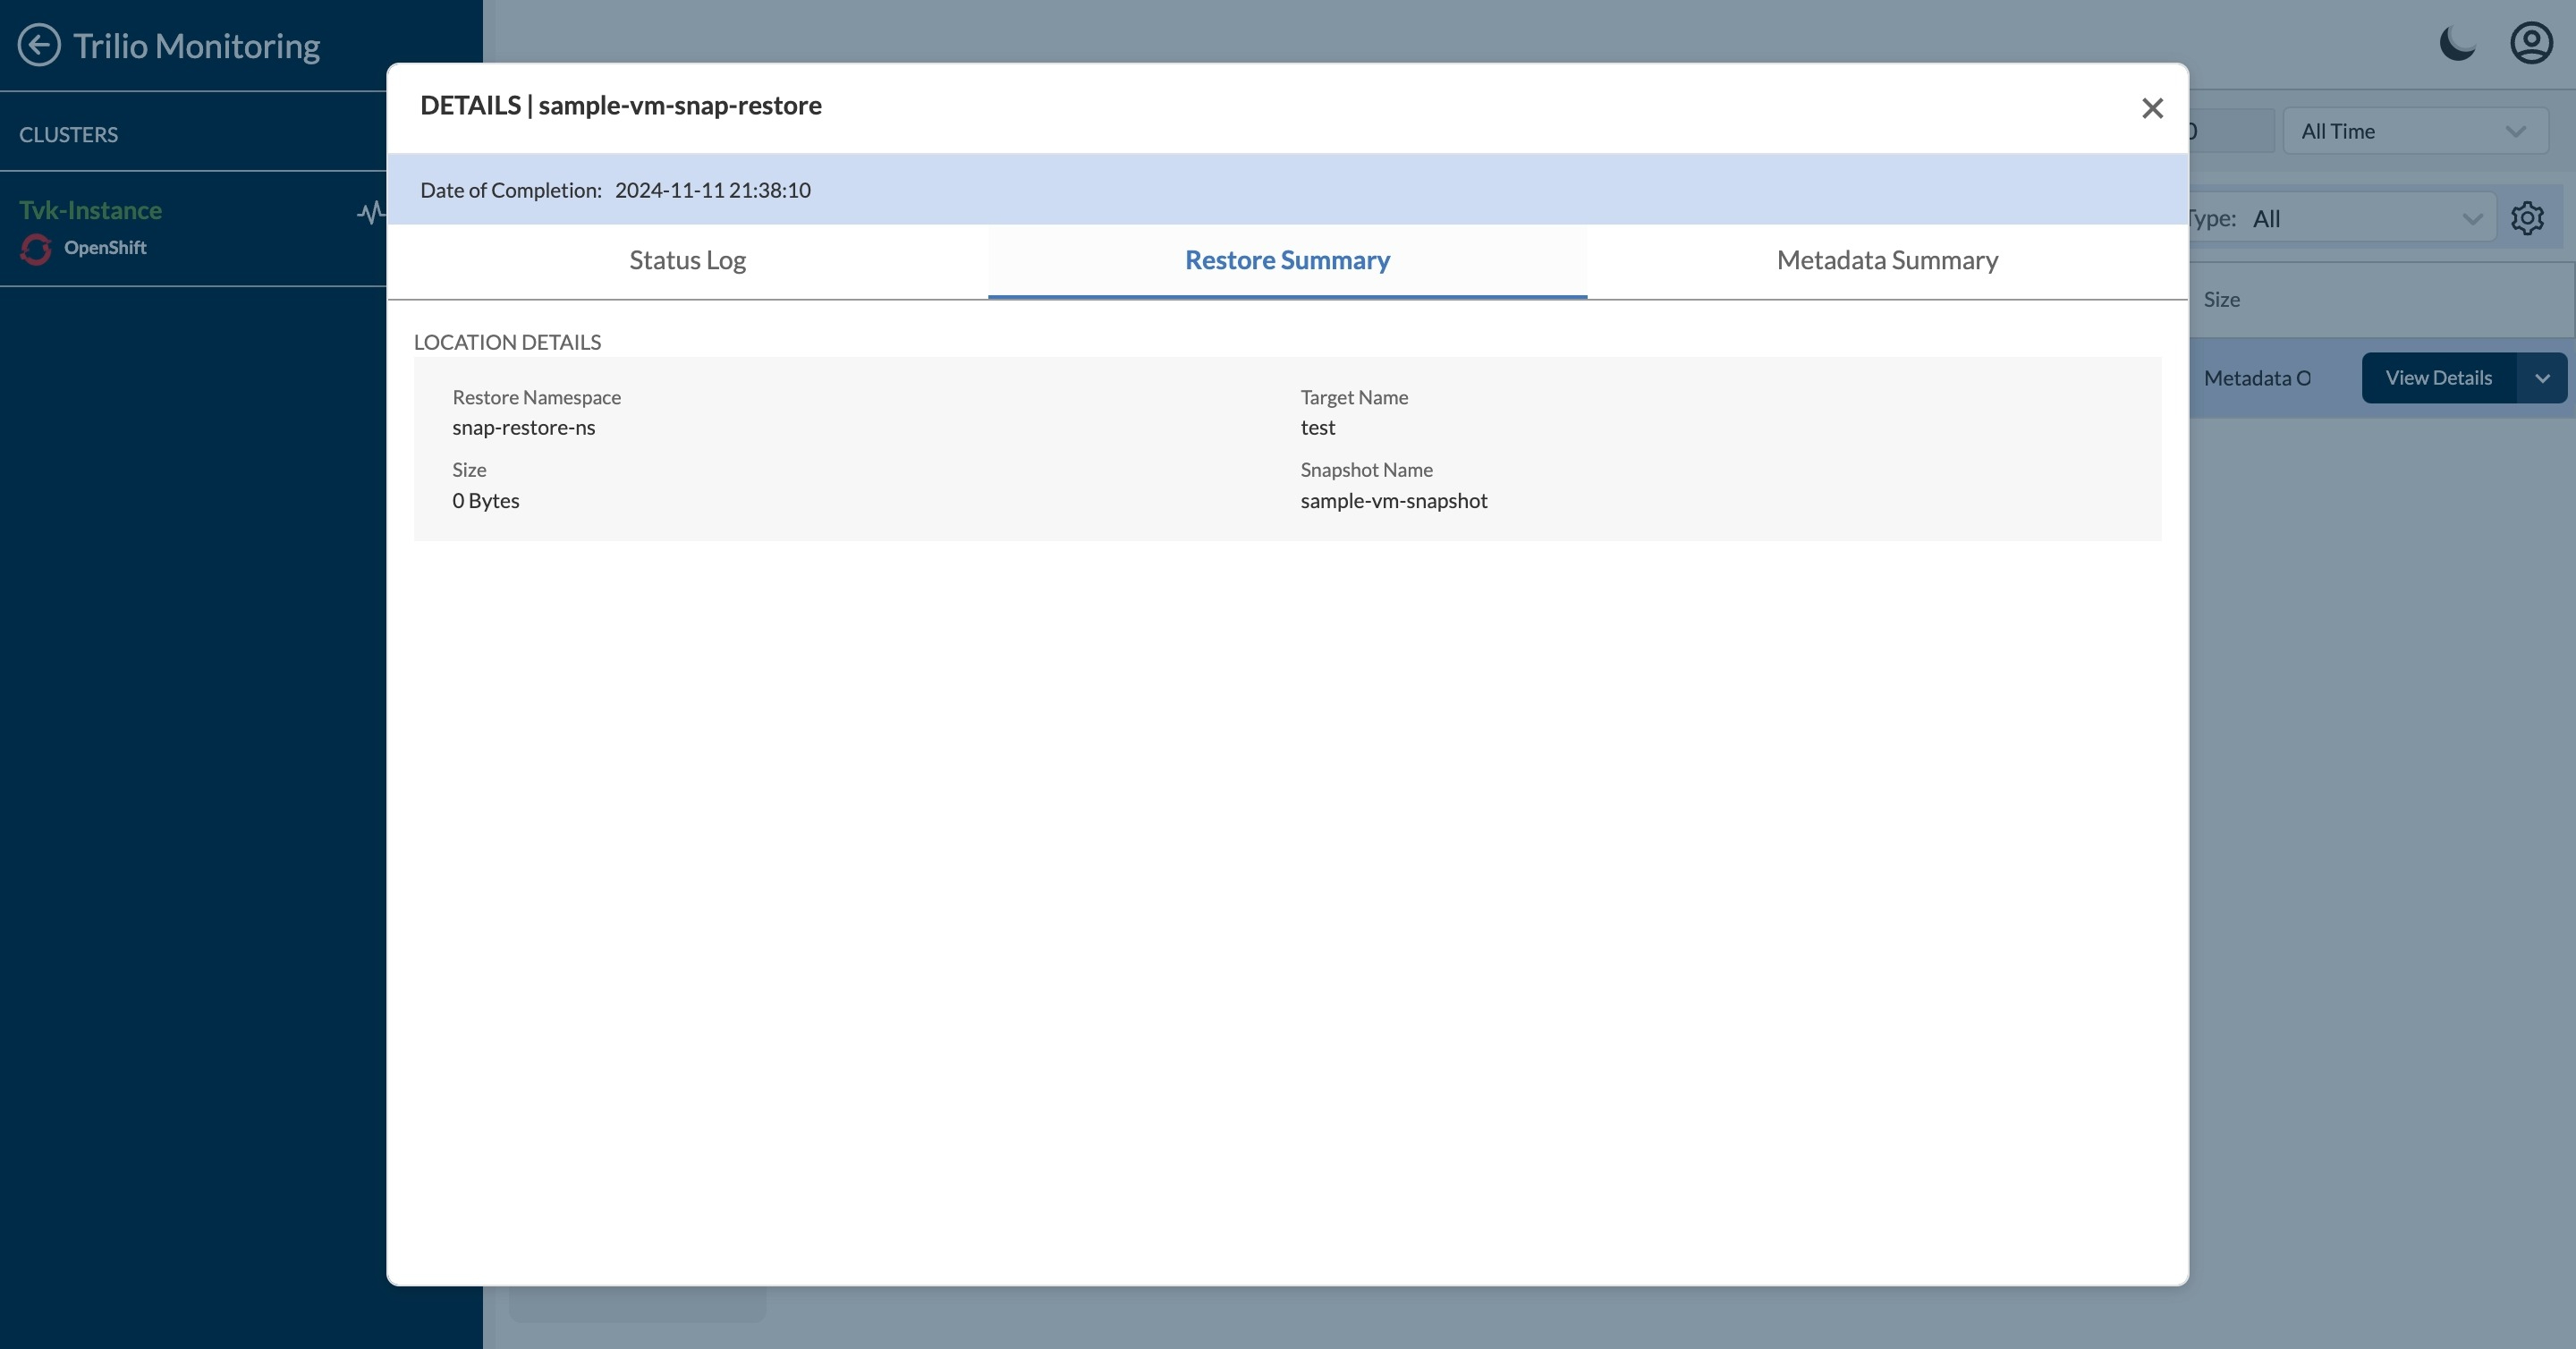
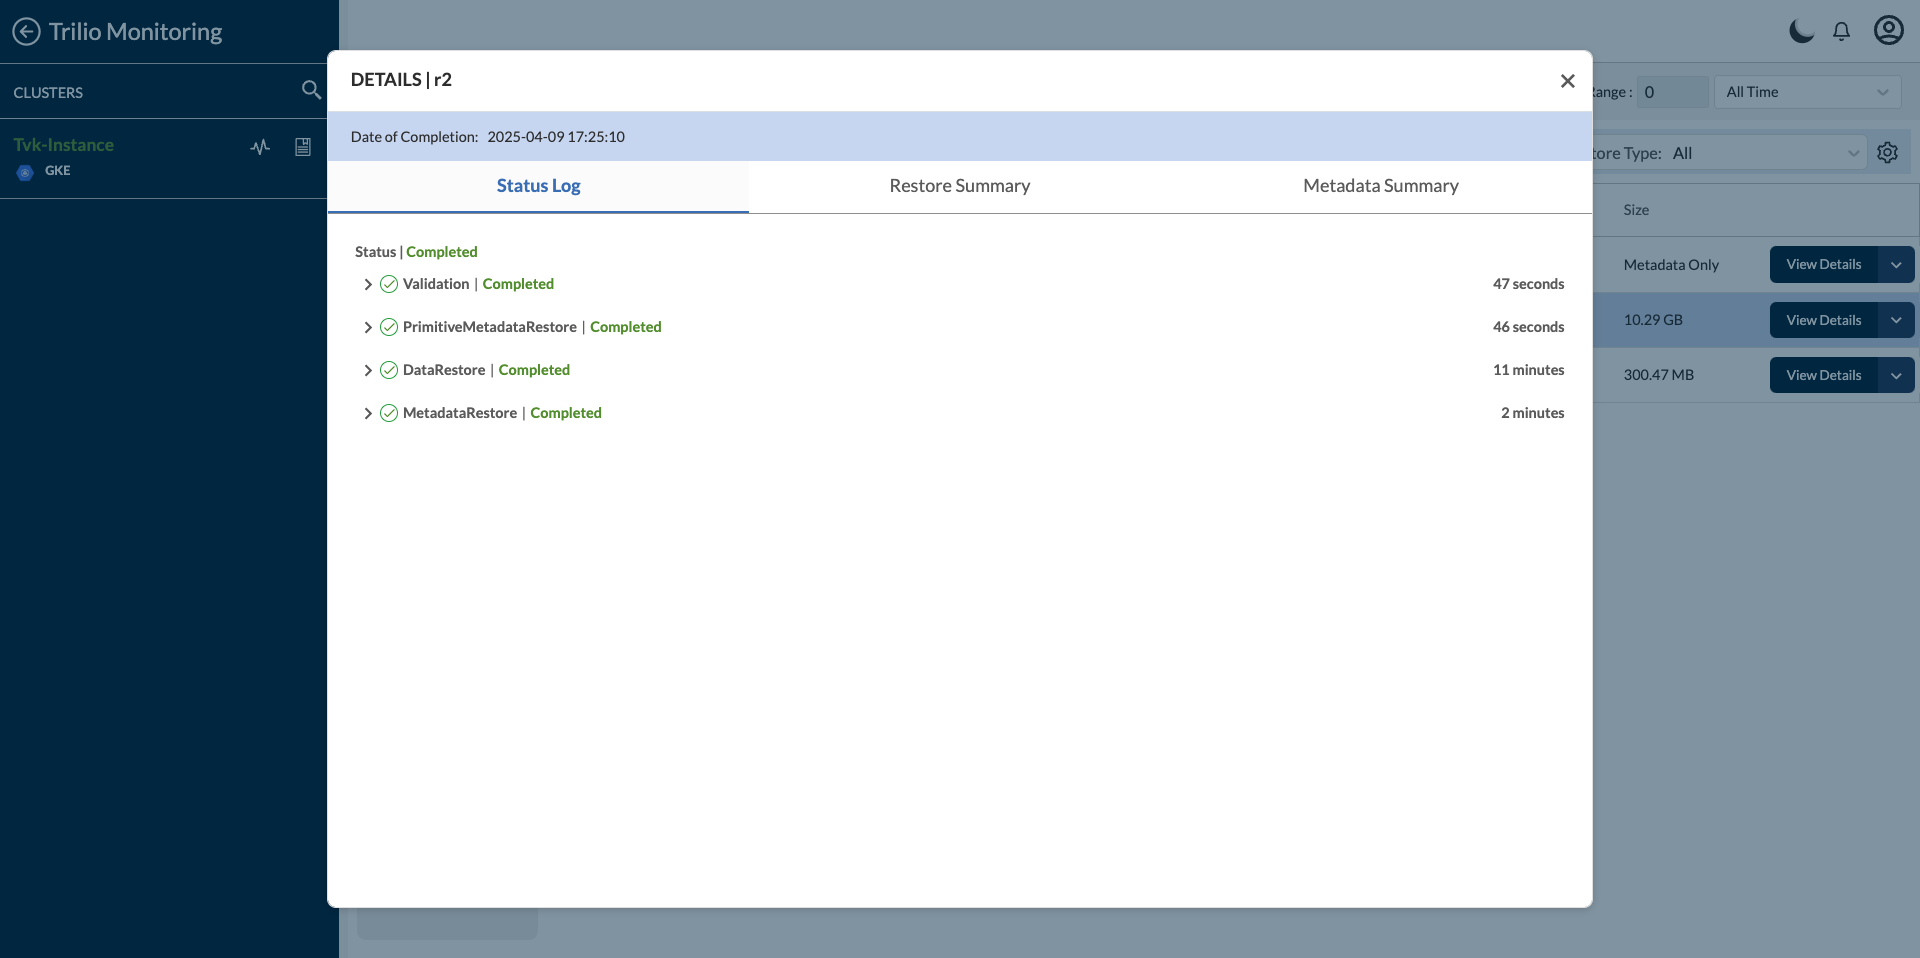
1. **View Details -** On clicking it, a pop-up opens with the Restore details. When you click on a specific tab, the corresponding details are displayed.
Metadata Sumary
Restore Summary
Status log
**Restore Size**
Indicates the logical size of the application data being restored. For snapshot-based restores, this will be shown as 0 bytes, as only the application metadata is restored by TVK, while the actual data is restored from the CSI Volume Snapshot.
**Restore Size**
Indicates the physical amount of disk space used by the application data after the restore is complete. This provides a more accurate reflection of the space consumed on the disk.
For snapshot-based restores, this will be shown as 0 bytes, as only the application metadata is restored by TVK, while the actual data is restored from the CSI Volume Snapshot.
**Metadata details**
Users can click on a particular metadata summary item to be taken to the Metadata Overview Page where additional details around the GVKO of a resource are provided. This is particularly useful to understand the components in a backup/snapshot before applying a restore transformation and similarly compare backup/snapshot metadata with restore metadata based on transforms that may have been applied before a restore.

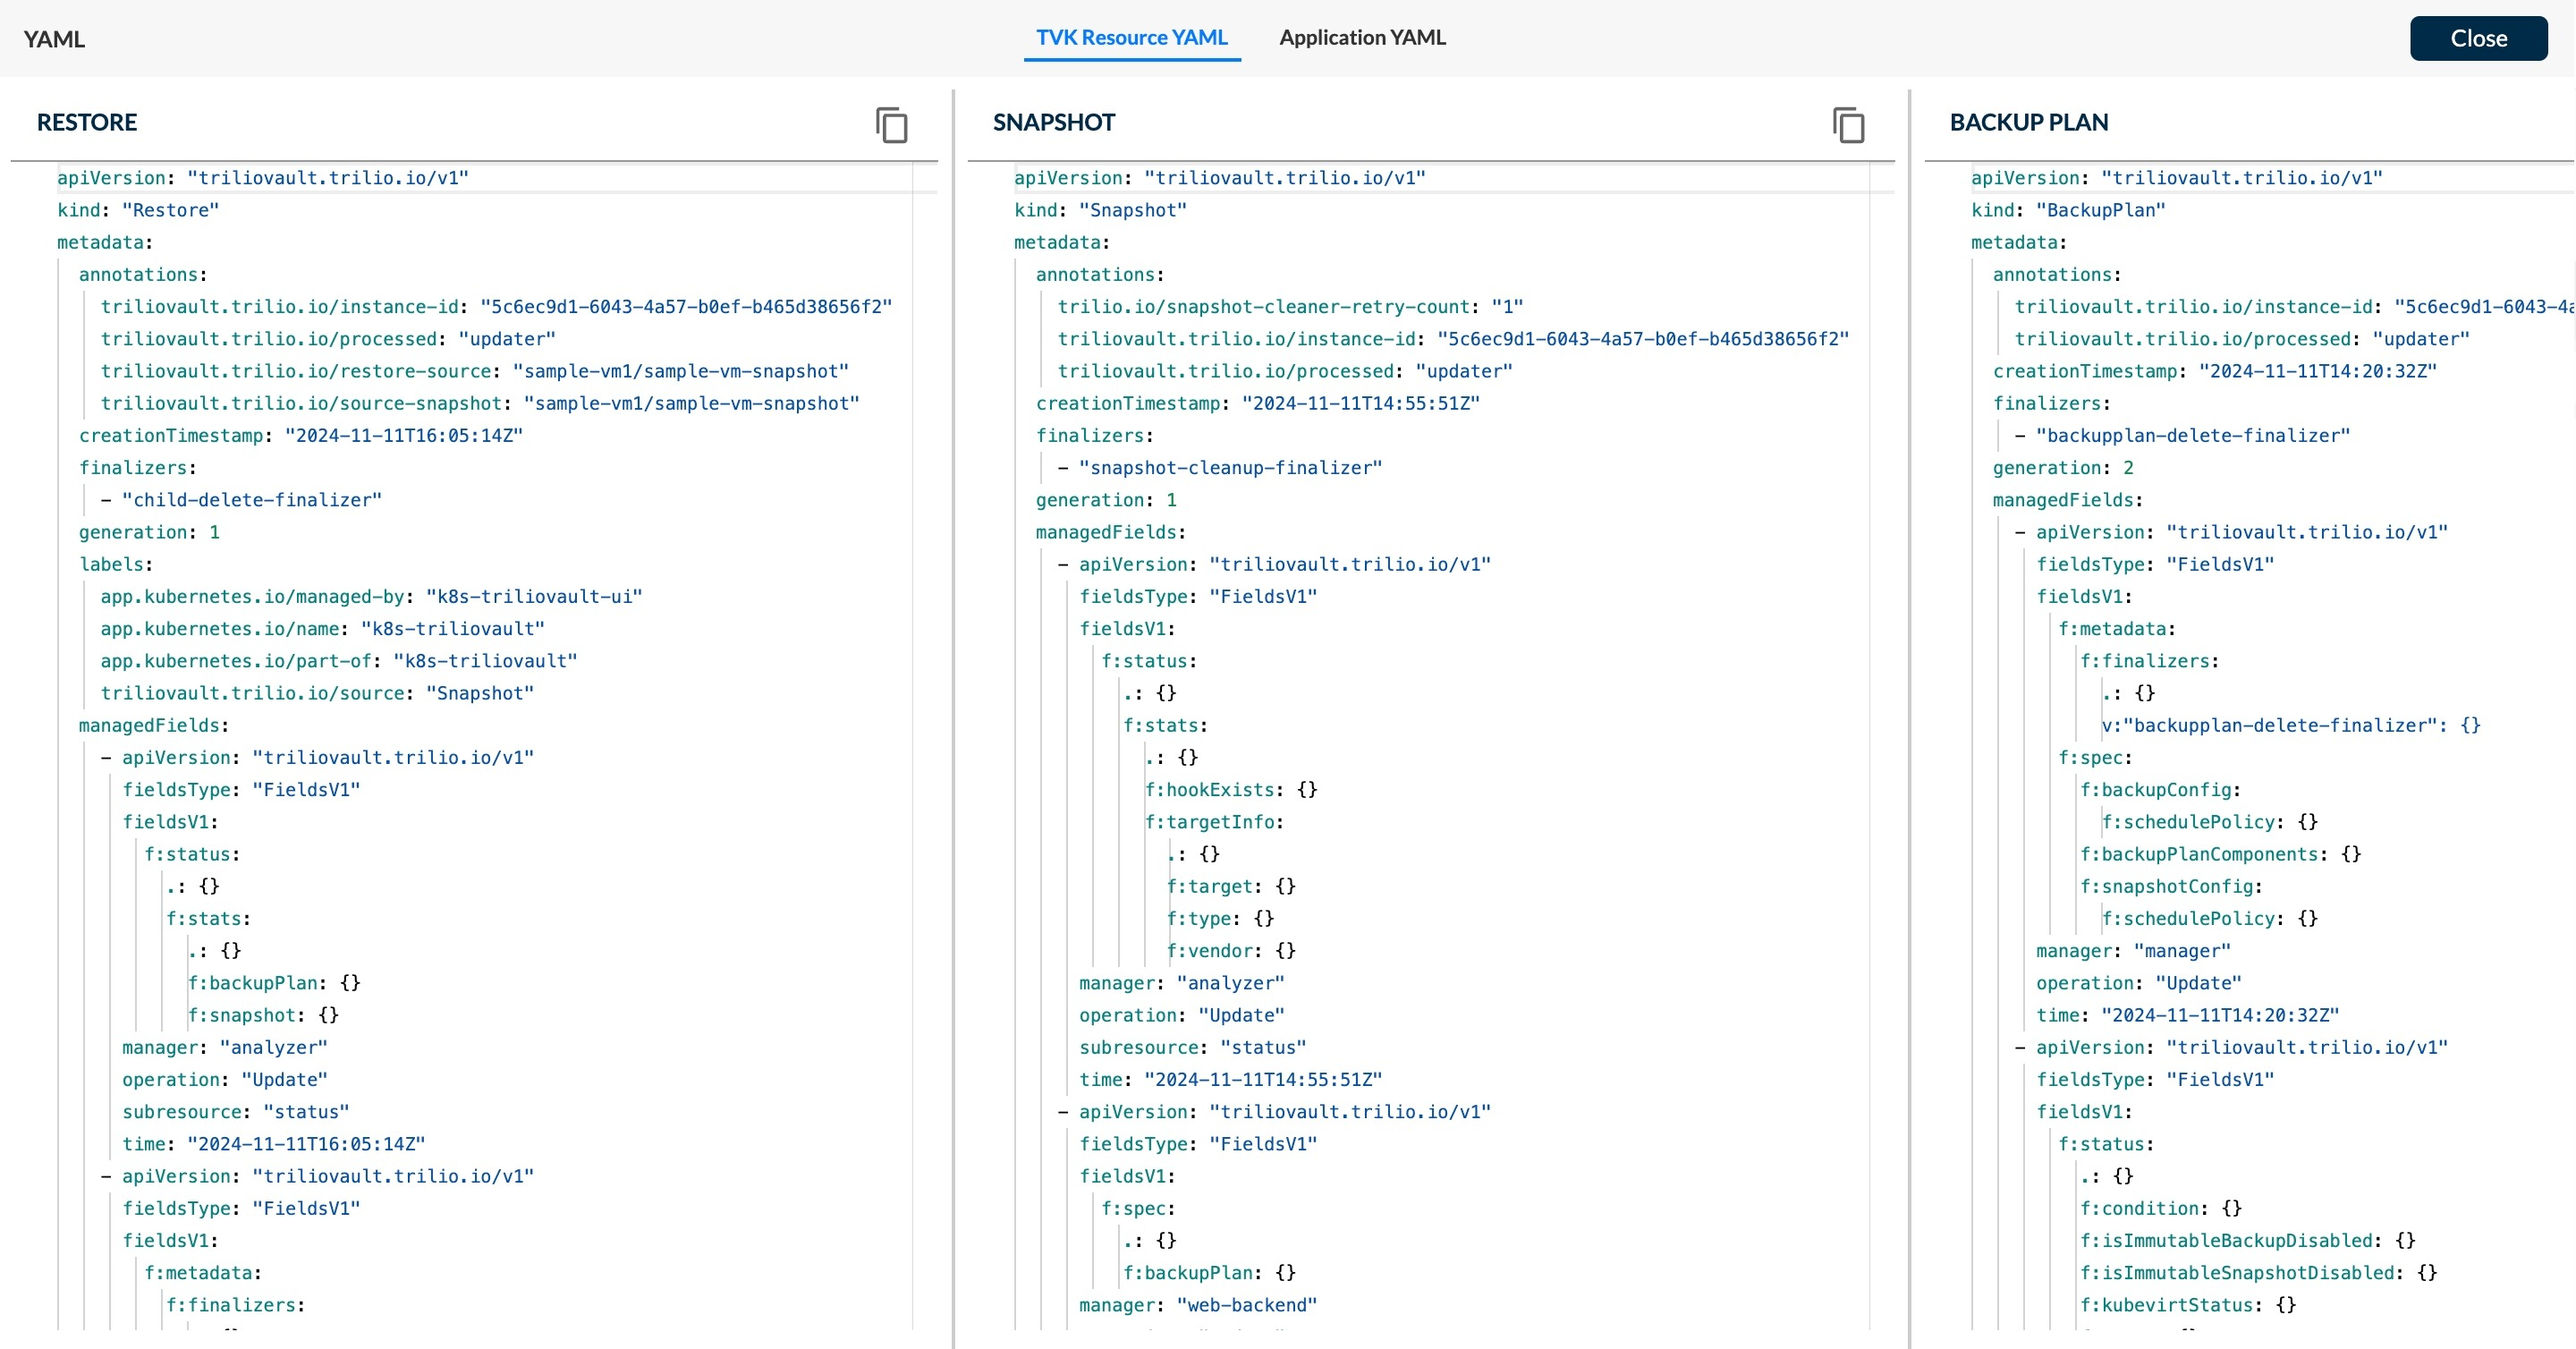
2. **View Yaml** - Click this to display a page with two tabs, **T4K Resource YAML** and **Application YAML**. **T4K Resource YAML** is displayed by default, which provides the ability to view and copy all YAML files for **Restore**, **Snapshot/Backup**, **Backupplan**, **Hook**, **Target** and **Target Credential Secret**.
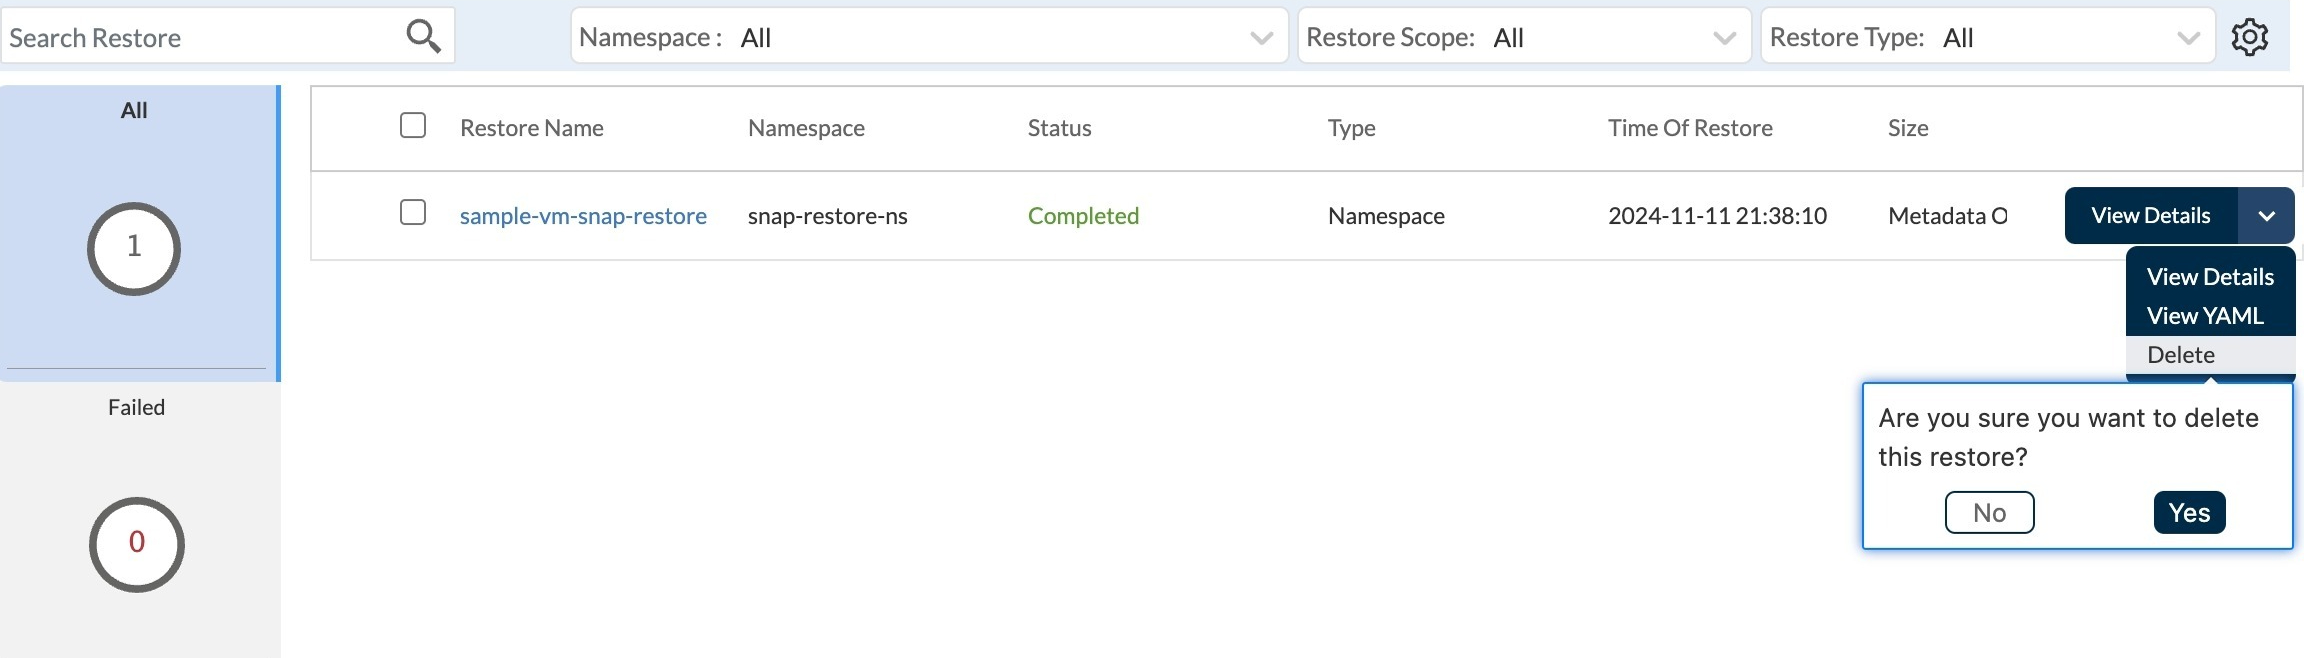
3. **Delete** - Select this to delete the corresponding Restore. You will be prompted to confirm that you want to proceed with the deletion. It will delete only Restores CR and not the actual restored application.
**Compare YAMLs** - Select multiple restores by clicking the corresponding selector checkboxes in the first column, or use the table header row checkbox to select/deselect all listed restores. When two or more restores are selected, a new option is provided - **Compare Yamls**.\
\
Clicking **Compare YAMLs** displays a side-by-side comparison of the selected backup-related YAMLs, which it splits into various resources (**Restore**, **Backup**, **Backupplan**, **Target,** and **Secret**). You can also copy the content from either YAML file using the copy symbol. Once finished, select **Close** to return to the parent menu.