T4K GitHub Runner
Why?
IAC is very important in Kubernetes Streamline ops from dev to production as much as possible. You want runners that can automate tasks around application development and delivery T4K has built a runner for GH that can do the following**.**
Assumptions
Source and destination kubernetes clusters are setup
T4K installed on the source and destination clusters with appropriate licenses
A backup location is created and available for use
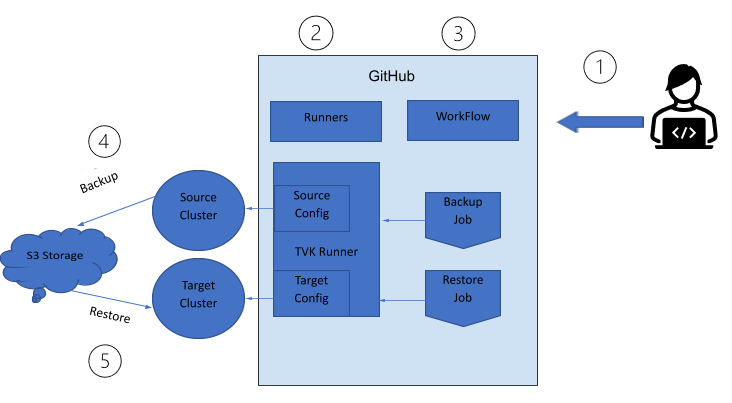
High-level Steps with Flowchart

Pre-requisites
In order to get started with the T4K runner ensure the following prerequisites are met:
Install T4K on the source and destination clusters with appropriate licenses
Ensure a backup location is created and available for use.
System Setup
Ref. Link - **** https://github.com/actions-runner-controller/actions-runner-controller
actions-runner-controller uses cert-manager for certificate management of Admission Webhook. Install cert-manager using below command:
$ kubectl apply -f https://github.com/jetstack/cert-manager/releases/download/v1.3.1/cert-manager.yamlInstall the custom resource and actions-runner-controller with kubectl. This will create actions-runner-system namespace in the Kubernetes cluster and deploy the required resources.
$ kubectl apply -f https://github.com/actions-runner-controller/actions-runner-controller/releases/download/v0.18.2/actions-runner-controller.yamlSetup authentication for actions-runner-controller to authenticate with GitHub using PAT (Personal Access Token). Personal Access Tokens can be used to register a self-hosted runner by actions-runner-controller.
Log-in to a GitHub account that has admin privileges for the repository, and create a personal access token with the appropriate scopes listed below:
Required Scopes for Repository Runners : repo (Full control)
Deploy the token as a secret to the Kubernetes cluster
$ GITHUB_TOKEN="<token>"$ kubectl create secret generic controller-manager -n actions-runner-system --from-literal=github_token=${GITHUB_TOKEN}Deploy a repository runner
Create a manifest file including Runner resource as follows:
# runner.yamlapiVersion: actions.summerwind.dev/v1alpha1kind: Runnermetadata:name: example-runnerspec:repository: summerwind/actions-runner-controllerenv: []\Apply the created manifest file to your Kubernetes
$ kubectl apply -f runner.yaml runner.actions.summerwind.dev/example-runner createdYou can see that the Runner resource has been created
$ kubectl get runnersNAME REPOSITORY STATUSexample-runner summerwind/actions-runner-controller RunningYou can also see that the runner pod has been running
$ kubectl get podsNAME READY STATUS RESTARTS AGEexample-runner 2/2 Running 0 1mThe runner you created has been registered to your repository
Executing the Runners
Create a workflow with 2 jobs - Backup and Restore
User Inputs:
kubeconfig files for source and destination clusters
Load the user input variables in the “.env”-
Backup target name and namespace on source cluster
Namespace to be backed up
Backup target name and namespace on destination cluster
Namespace to be used for restore
Workflow triggers - set appropriate triggers for the job to run
The workflow run is made up of Backup and Restore jobs that run sequentially
Backup job details:
runs-on: self-hosted
Setup the environment
install kubectl
Load kubeconfig files for source and destination clusters
Load the user inputs -
Backup target name and namespace on source cluster
Namespace to be backed up
Backup target name and namespace on destination cluster
Namespace to be used for restore
Create a backup plan
Perform backup
Capture the backup location that will be needed for the restore on destination cluster
Restore job details:
runs-on: self-hosted
Setup the environment
install kubectl
Load kubeconfig files for source and destination clusters
Load the user inputs -
Backup target name and namespace on source cluster
Namespace to be backed up
Backup target name and namespace on destination cluster
Namespace to be used for restore
Perform restore using the location of the backup
Extending the runner
The workflow can be extended to support additional destination clusters to cover several environments as part of the test cases.
Different storage classes that may be in use in the source and destination clusters are supported via T4K transforms.
Automation activities - can extend the runners to handle an array of applications instead of specific ones
Conclusion
With the advent of technology and proliferation of multiple software technologies, automation is key for success. Automation can only be possible via IAC. With the rise and mainstream adoption of Kubernetes, microservices and IAC is the future. Any technology entering the IT market must enable operations and control via code. Trilio is a purpose-built solution providing point-in-time orchestration for cloud-native applications. Trilio is able to support the application lifecycle from Day 0 to Day 2 by enabling the respective personas to perform their objectives leveraging IAC.\