
Backup Plans
This page provides users with an overview of all the backup plans associated with a selected cluster.
Accessing Backup Plans
Log in to the T4K Management Console.
From the left panel menu, click Backup & Recovery.
Select one of your clusters from the left panel menu, which displays a dropdown menu for you to select from.
From this dropdown menu, select Backupplans.
From the page displayed, choose what you want to configure or action. Refer to the following image and descriptions in the associated table.
Backup Plans Overview
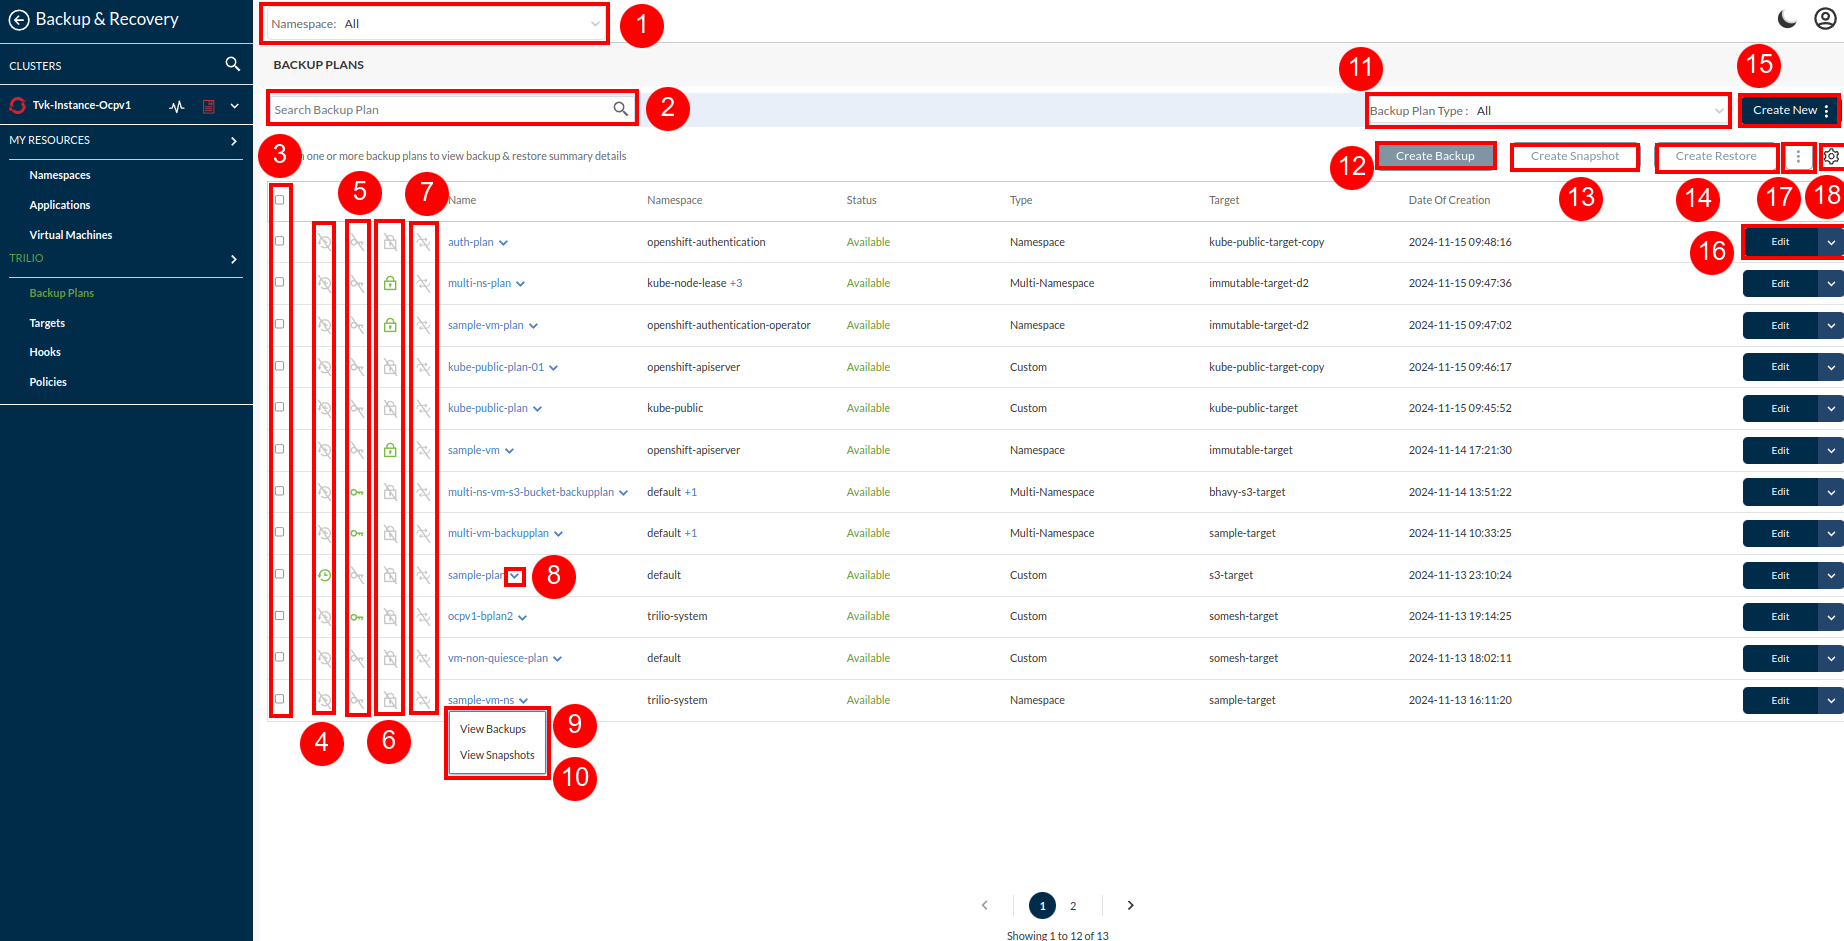
1
Namespace selector
This dropdown lists all namespaces in the selected cluster alphabetically. Click one or all to display the selection.
2
Search
The search field may be used to find the backup plan that you want to display. The list filters as you type.
3
Selector checkboxes
Checkboxes may be selected/deselected to enable Create Backup, Create Snapshot or Create Restore buttons and can also facilitate comparision of two plan's YAMLs or to view backup and restore summary of multiple backup plans at a time.
4
Schedule icon
This icon indicates whether a backup has a schedule configured or not.
5
Encryption Icon
The icon indicates wather the target is Encrypted or not.
6
Immutable Target Icon
This icon indiactes if the backupplan plan is created using a immutable target.
7
Continuous Restore Icon
This indicates if continuous restore confugrations are provided in the backup plan.
8
Collapse Icon
This icon opens a dropdown with options to view Backups or Snapshots, redirecting to their respective overview pages.
9
View Backups
This option redirects to Backup Overview page.
10
View Snapshots
This option redirects to Snapshot Overview page.
11
Filters by backup plan type
Use this filter dropdown fields to narrow your search for backup plans of a certain type. The options are:
All
Operator
Helm
Custom
Namespace
Multi-namespace
12
Create Backup
This button is usd in combination with Selector checkbox button, select one backuplan and click this button to create a backup.
13
Create Snapshot
This button is usd in combination with Selector checkbox button, select a plan and click this button to create a snapshot.
14
Create Restore
This button is usd in combination with Selector checkbox button, select a plan and click this button to create a restore (if there is atleast one available backup or snapsot of that plan).
15
Create New
Create a new backup plan by selecting this dropdown. Select from Application, Single Namespace, or Multi-namespace. Refer to: Create Backup Plans
16
Actions
This button displays a dropdown menu of further actions that can be taken in relation to a single backup. Menu options are:
Edit
Create Backup
View Backup & Restore summary
View YAML
Delete
Refer to: Backup Plans - Actions
17
Bulk Actions
This button is used in combination with Selector checkbox button , select one or more plans to view backup and restore summary or select any two plans to compair YAMLs.
18
Setting
This is to adjust the columns visibility in listing.