Namespaces - Actions
This page lists the various actions that may be executed by a user for a single namespace.
The Backup & Recovery's Namespace page is primarily an informational page, presenting the user with a complete overview of everything related to their namespaces. However, there are some actions that the user can take, which are detailed in the following sections of this page. There are four actions that may be executed for a single namespace:
Actions - Create Backup
From the Backup & Recovery's Namespace page:
Identify the listed namespace for which you wish to perform an action.

Click the corresponding Actions button on the right side of the main UI window.
From the menu displayed, select Create Backup.
Optionally, from the window displayed, you can place a check in the Show explicit backupplans for the selected items checkbox. This results in the existing backup plan list showing only backup plans for selected items. For example, if a user has selected NS1 and NS2, then backup plans containing NS1 and NS2 only will be shown. Otherwise, backup plans containing either NS1, NS2 or both together will be shown.
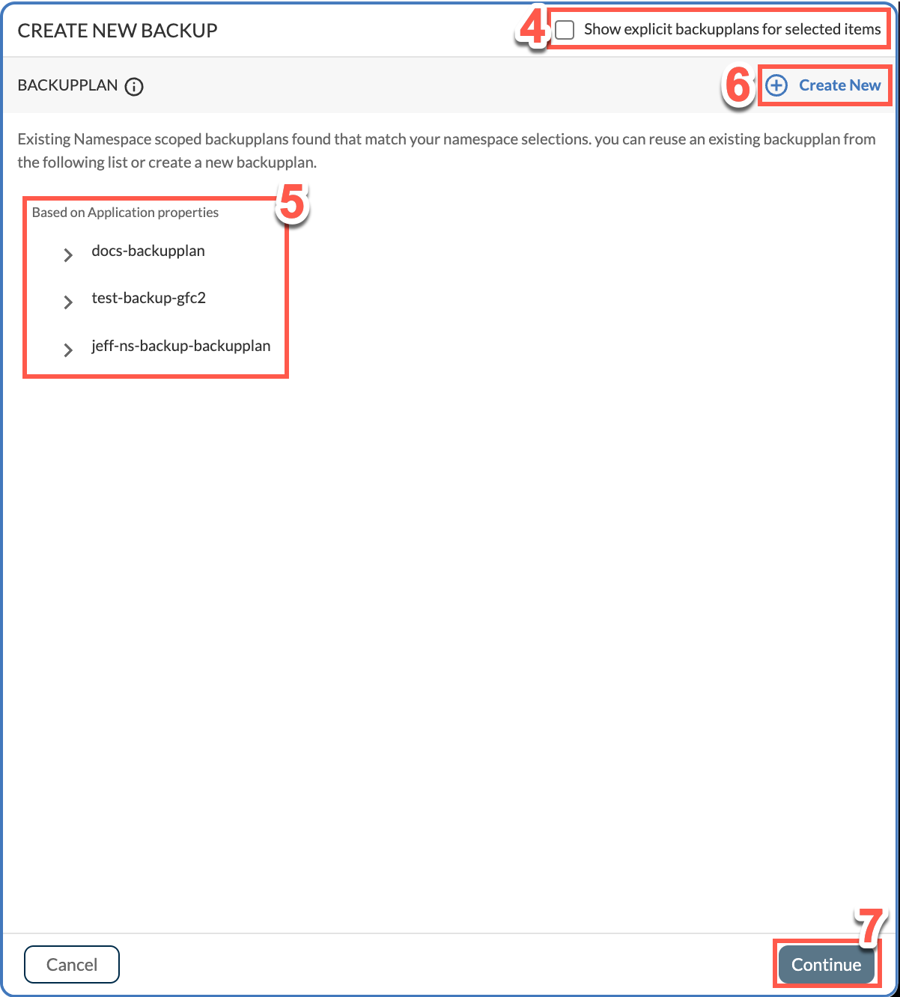
Check if any existing backup plans are available. If you see an existing backup plan that suits, select it and skip to step 7.
If no existing plan is suitable, select Create New and follow the instructions in Backup Plan - Single-namespace. Note that if you create a new backup plan, it may take some time before it becomes active and is able to be selected. Once the new backup plan becomes available, select it and proceed.
Select Continue.
In the window displayed, type a meaningful name for your new backup and use the toggle switch to choose between Full backup and Incremental backup.
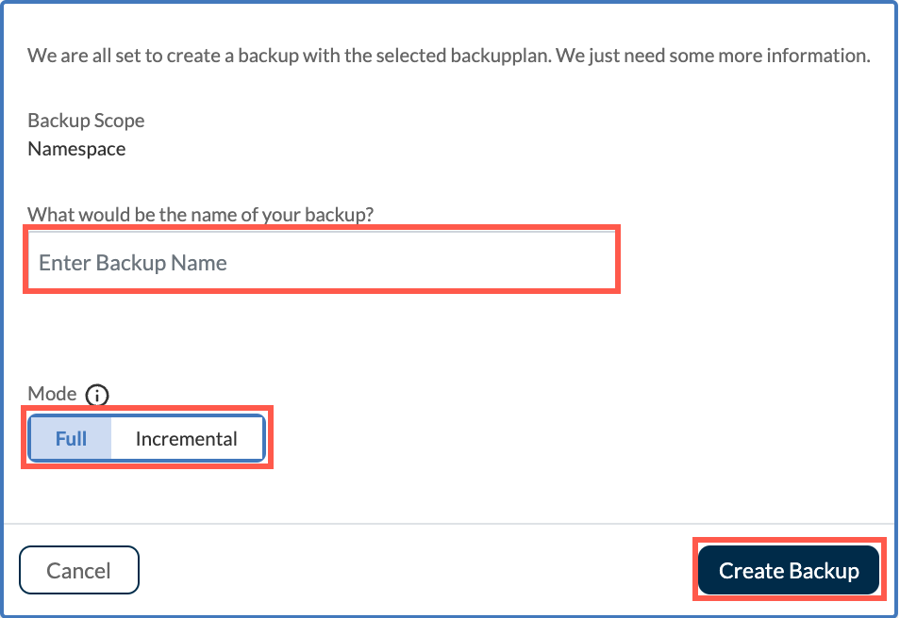
Then click Create Backup.
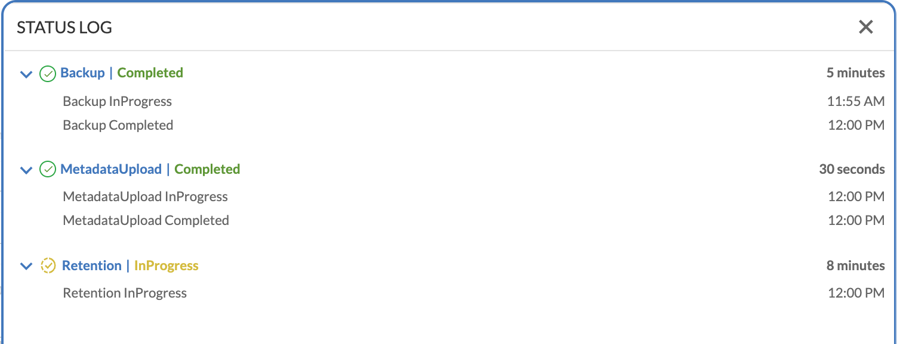
Once the backup is complete, the STATUS LOG window displays, detailing the status of the backup and if there were any errors.
Actions - View Backup & Restore summary
From the Backup & Recovery's Namespace page:
Identify the listed namespace for which you wish to perform an action.

Click the corresponding Actions button on the right side of the main UI window.
From the menu displayed, select View Backup & Restore summary, which displays the Monitoring window.
From the Monitoring window, optionally you may view the information provided in the BACKUP SUMMARY panel.
 You can dig deeper into this by clicking Details in the same panel, which displays the following page:
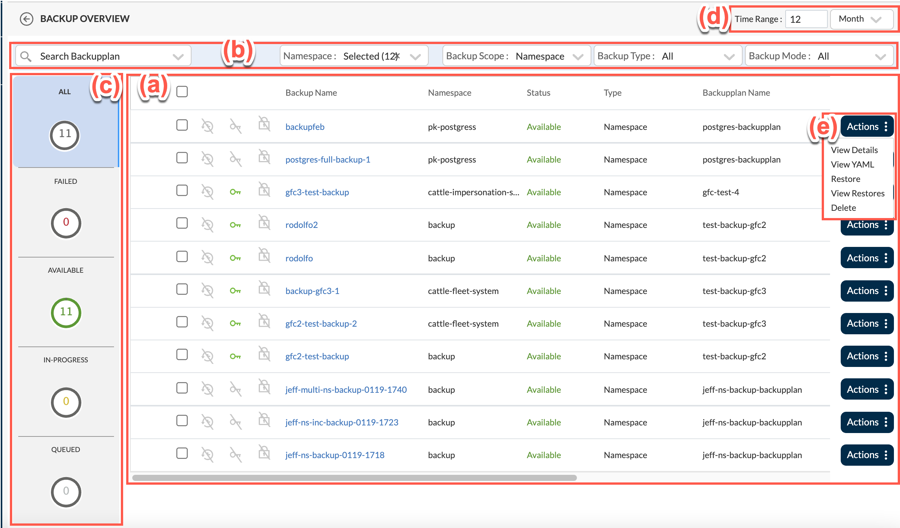
(a) View all backups in the main window, which has multiple columns to provide a complete overview of each backup.
(b) Use the multiple column filters and search field to filter to the exact results that you want.
(c) View backups by status - On the left side, you can filter backups by All, Failed, Available, In Progress, or Queued.
(d) Filter by Time Range - Set the time unit to Hour, Day, Week or Month and then select a corresponding number.
(e) By clicking Action beside any backupplan, you can also take some actions such as:
View Details - This displays a window with status details for Status Log, Backupplan Summary, and Metadata Summary.

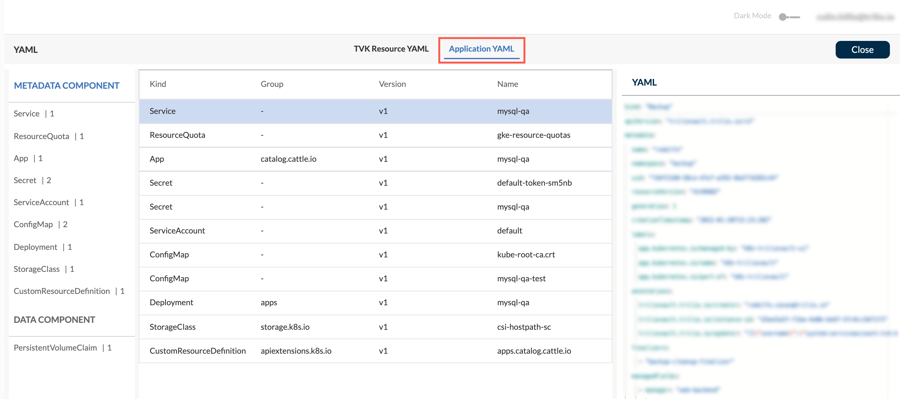
View YAML - Click this to display a page with two tabs, T4K Resource YAML and Application YAML. T4K Resource YAML is displayed by default, which provides the ability to view and copy all YAML files for Backup, Backupplan, Hook, Target and Target Credential Secret.
 The Application YAML tab provides the ability to see an overview and copy application YAML files.
Restore - Click this to display a page with two tabs, Basic and Advanced. In the Basic tab, type a name for your backup into the Name field, select the namespace to restore from the Restore Namespace dropdown list, and use the Restore Flags toggle switches to configure your restore. Optionally, you can see a list of ignored resources by selecting Click here at the bottom of the screen. Once your backup is configured in this tab, click Next. The Advanced tab then displays, where you can Transform Components, Exclude Resources and set Hook Configuration. If you make changes in the Advanced tab, you must then click Save. Your backup now proceeds and once completed, you will see the Restore Backup success statuses.
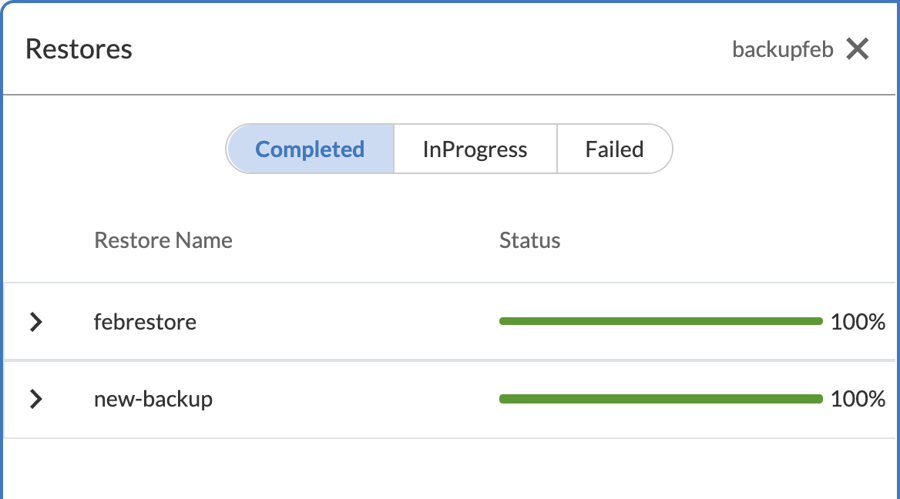
View Restores - This provides users with a top-level view of restores, categorizing them into Completed, InProgress, and Failed statuses.
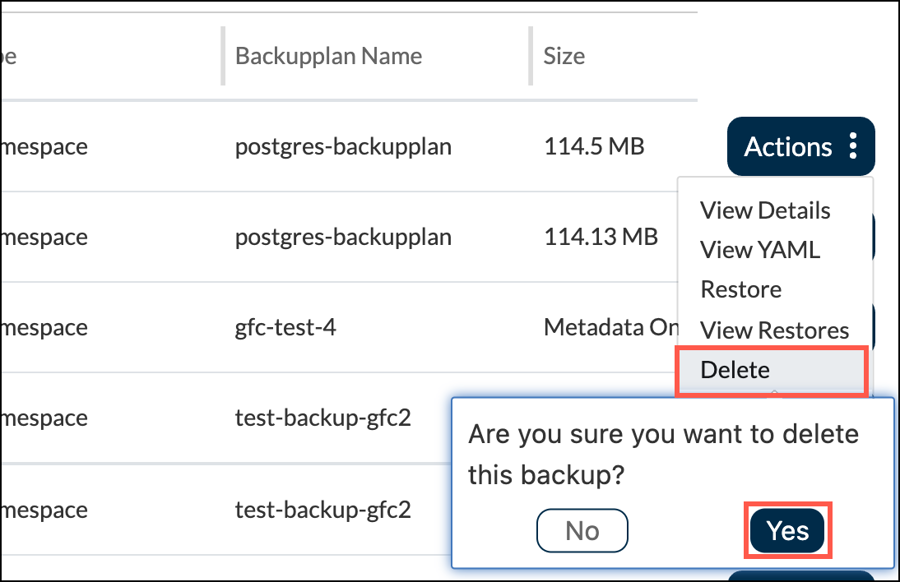
Delete - Select this to delete the corresponding backup. You will be prompted to confirm that you want to proceed with the deletion.
(f) Compare YAMLs - Select multiple backups by clicking the corresponding selector checkboxes in the first column, or use the table header row checkbox to select/deselect all listed backups. When two or more backups are selected, a new option is provided - Compare Yamls.
 Clicking Compare YAMLs displays a side-by-side comparison of the selected backup-related YAMLs, which it splits into various resources (Backup, Backupplan, Target, Secret, and Hook). You can also copy the content from either YAML file using the copy symbol. Once finished, select Close to return to the parent menu.
From the Monitoring window, optionally you may view the information provided in the RESTORE SUMMARY panel.
 You can dig deeper into this by clicking Details in the same panel, which displays the following page:
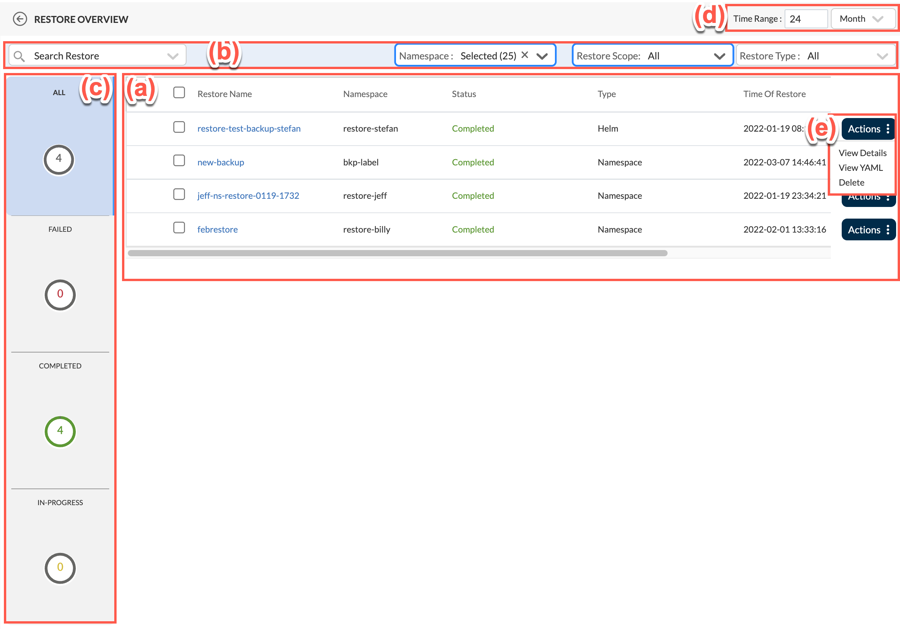
(a) View all restores in the main window, which has multiple columns to provide a complete overview of each restore.
(b) Use the multiple column filters and search field to filter to the exact results that you want.
(c) View restores by status - On the left side, you can filter restores by All, Failed, Completed, and In Progress.
(d) Filter by Time Range - Set the time unit to Hour, Day, Week or Month and then select a corresponding number.
(e) By clicking Action beside any restore, you can also take some actions such as:
View Details - This displays a window with status details for Status Log, Restore Summary, and Metadata Summary.

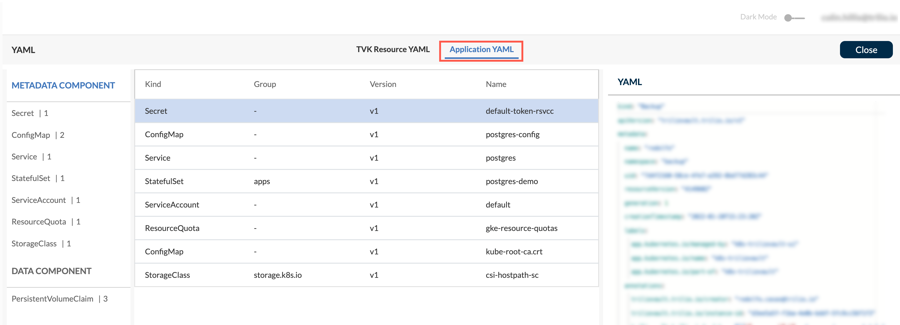
View YAML - Click this to display a page with two tabs, T4K Resource YAML and Application YAML. T4K Resource YAML is displayed by default, which provides the ability to view and copy all YAML files for Restore, Backup, Backupplan, Hook, Target and Target Credential Secret.
 The Application YAML tab provides the ability to see an overview and copy application YAML files.
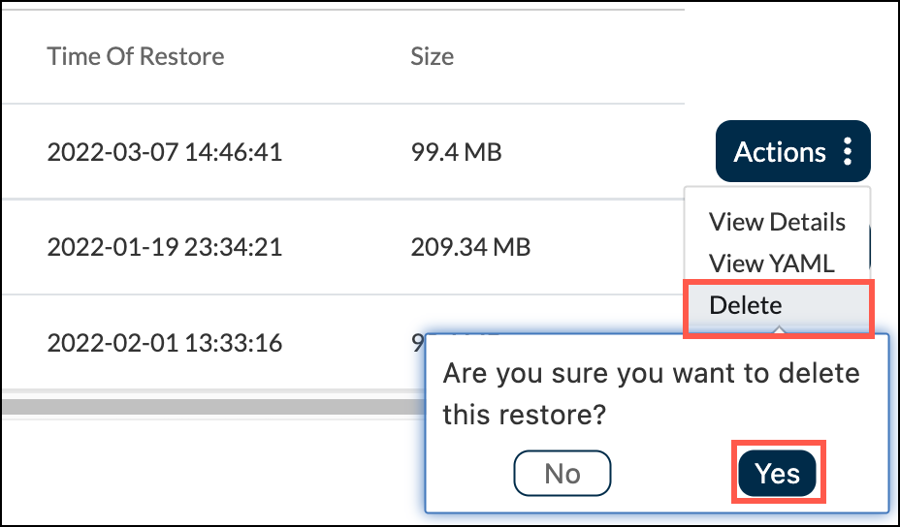
Delete - Select this to delete the corresponding backup. You will be prompted to confirm that you want to proceed with the deletion.
(f) Compare YAMLs - Select multiple restores by clicking the corresponding selector checkboxes in the first column, or use the table header row checkbox to select/deselect all listed restores. When two or more restores are selected, a new option is provided - Compare Yamls.
 Clicking Compare YAMLs displays a side-by-side comparison of the selected backup-related YAMLs, which it splits into various resources (Restore, Backup, Backupplan, Target, and Secret). You can also copy the content from either YAML file using the copy symbol. Once finished, select Close to return to the parent menu.
In the Monitoring window, all Restore Points are listed in the table.
 Field No.Description
a
This table lists the selected Restore Points and in the other columns, details about those restore points is provided.
b
In the Selected Columns dropdown, the Backup Name and Date of Expiry columns are mandatory to display. However, the third column (Namespace in this example) can be changed to Scheduling Policy, Encrypted, Immutable or Date of Creation.
c
The Backup Name and Date of Expiry columns are mandatory to display. Only the third column is configurable.
d
Click on any restore point in the table for more details, such as: - Restore - View Restores - Status Logs - View Metadata - Delete - View YAML
e
Optionally, you can place a check in the Show explicit backups and restores for the selected items checkbox. Checking this box will result in the widgets showing only backups and restores for selected items. For example, if a user has selected NS1 and NS2, then only backups and restores containing NS1 and NS2 will be shown. Otherwise, backups and restores containing either NS1, NS2 or both NS1 and NS2 together will be shown.
f
Exit this informational page by clicking X.
Actions - View Namespace details
From the Backup & Recovery's Namespace page:
Identify the listed namespace for which you wish to perform an action.

Click the corresponding Actions button on the right side of the main UI window.
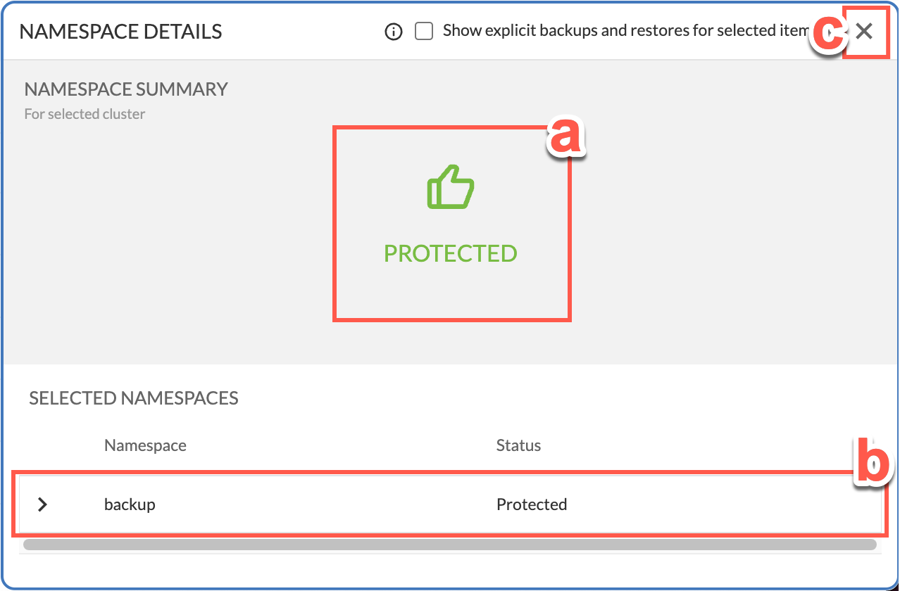
From the menu displayed, select View Namespace details, which displays the following window**.**
a
This displays whether a namespace is protected or unprotected.
b
This table lists all associated objects and the count for each. You can select each object to see more details.
c
Exit this informational page by clicking X.
Actions - View Target summary
From the Backup & Recovery's Namespace page:
Identify the listed namespace for which you wish to perform an action.

Click the corresponding Actions button on the right side of the main UI window.
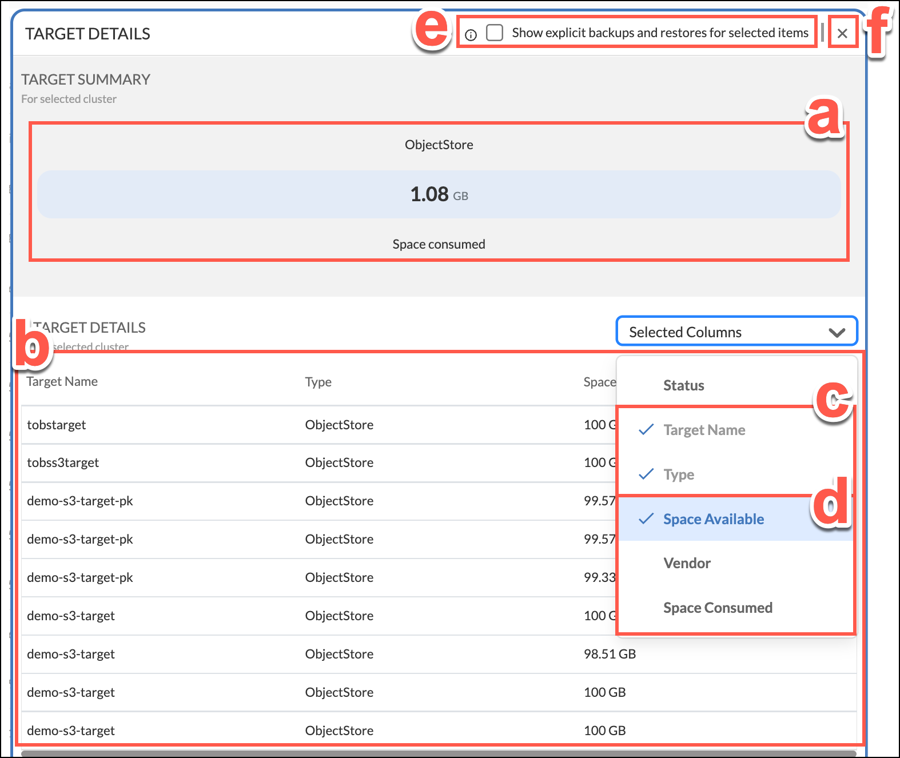
From the menu displayed, select View Target summary.
a
The total space consumed by all selected targets.
b
This table lists the selected targets and displays the space that they each consume. The first two columns are mandatory and the third column (Space Available) can be changed to Vendor or Space Consumed.
c
In the Selected Columns dropdown, the Target Name and Type columns are not optional to display.
d
the Selected Columns dropdown, the Space Available, Vendor, and Space Consumed columns are optional to display. Select which of these three columns to display.
e
Optionally, you can place a check in the Show explicit backups and restores for the selected items checkbox. Checking this box will result in the widgets showing only backups and restores for selected items. For example, if a user has selected NS1 and NS2, then only backups and restores containing NS1 and NS2 will be shown. Otherwise, backups and restores containing either NS1, NS2 or both NS1 and NS2 together will be shown.
f
Exit this informational page by clicking X.